
Introduction
The internet world is expanding quicker now. Information technology systems have unavoidably become a part of every aspect of our lives. When we want to organize a trip, we use Google to look out for the most well-known locations that are worthwhile stopping by. Additionally, we make hotel reservations through the application platform. As a result, technology is certainly there.
As a business, we rely heavily on technology to offer our services, facilitate transactions, communicate with our clients, store important data, perform a range of other critical functions. However, this dependence on technology also makes us vulnerable to cybersecurity attacks, which can compromise the security and integrity of our systems and put our clients’ sensitive information at risk. Every time we use the internet, we leave behind a digital trail of information that can be used by hackers and other malicious actors to gain unauthorized access to our systems, steal sensitive data, and launch attacks against our clients or partners.
Malware Analysis in Theory
Malware Analysis is an action of dissect malicious code to study and understand its behaviour, function, and how it impact the infected system. The goal of conduct malware analysis is to understand its behaviour, detect, and develop effective countermeasures from malware attack.
Malware analysis (MA) comprises of two types of analysis, which we would conduct both for effectively identifying the malware including,
- Static Analysis, without detonating (execute) the malware to study its potentially function by disassembling source code.
- Dynamic Analysis, also known as Heuristic or Behaviour analysis, is detonating (execute) the malware to study its movement, behaviours, and observe its impact.
Environment Setup
In this section we are going to divide into two parts including,
- Hypervisor Setup (Virtual Machine)
- Virtual Machine Network Configuration for safety MA
Hypervisor
Windows 10 -
Windows 10 would be our choice for host-based artifact malware analysis machine in this article. So, we could download .iso file on the link below,
After completely installed Windows 10, we are going to install toolkits needed to conduct malware analysis.
Therefore, there is a toolkit called “FlareVM” developed by Mandiant. We can download FlareVM using link below,
Since the FlareVM repository has mentioned all the instruction guide. Therefore, we would not mention it here.
Remnux -
Remnux is a linux toolkit for reverse-engineering and analyzing malicious software. Remnux is debian-based linux distribution where it collects all tools need in reverse-engineering and malware analysis.
Network Setup
We would be using internal network in order to completely safe our host machine from MA machine. Since Internal Network is not allow your host machine to communicate with VM’s machine. Therefore, it is more flexible and useful for us to conduct a malware analysis.
REMnux Network Setup -
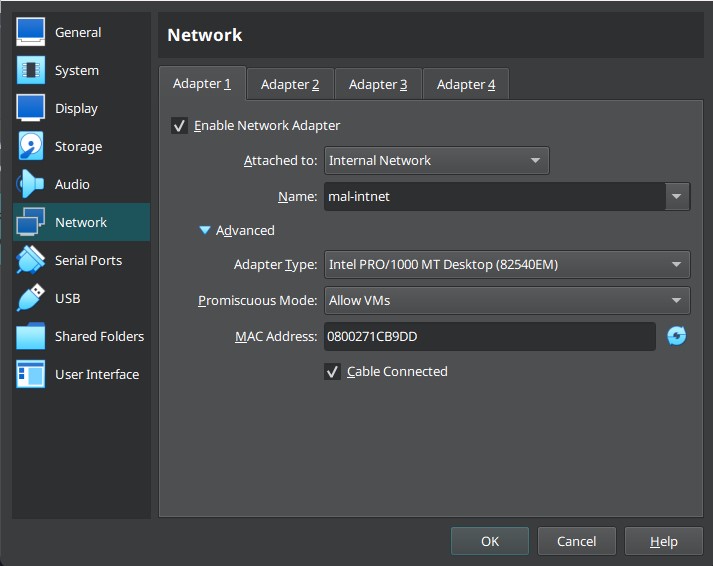
We need to create an Internal Network and associate with both VMs to it. Therefore, we will start with REMnux by following this step below:
- Right-click on the REMnux VM, then go to Settings…
- Click on Network tab
- In the Attached to drop-down menu, choose Internal Network
- Then give a preferred name to the internal network, for example,
mal-intnet. - Click on the Advanced drop-down menu, then enable the Promiscuous Mode to Allow VMs
- Then click Okay
Finally, your completely setting up would similar to the picture shows below,
It is great to notice that the internal network does not provide a DHCP server. Therefore, we have to manually define the statip IP address for the REMnux host.
In this article, we are going to use netplan utility. The netplan utility uses YAML configuration file to control the host’s adapter settings.
Open the netplan config file using vim (don’t for get to run as privilege permission)
1
sudo vim /etc/netplan/01-netcfg.yaml
1
2
3
4
5
6
7
8
9
# This file describes the network interfaces available on your system
# For more information, see netplan(5).
network:
  version: 2
  renderer: networkd
  ethernets:
    enp0s3:
      dhcp4: yes
From here, we have to remove the code snippet above and assign all network information statically. The comple configuration yaml shows below:
1
2
3
4
5
6
7
8
9
10
# This file describes the network interfaces available on your system
# For more information, see netplan(5).
network:
  version: 2
  renderer: networkd
  ethernets:
    enp0s3:
      dhcp4: no
      addresses: [10.10.0.3/24]
      gateway4: 10.10.0.1
Then, we need to apply netplan.
1
2
3
4
5
# Apply netplan configuration
sudo netplan apply

# To check whether the network adapter works fine or not, using command below,
sudo ip -br -c a
Setting Up inetsim -
Next, we are going to config inetsim for established fake internet which would be using when conducting malware analysis.
inetsim is a software suite that uses for simulating common internet services in a lab environment. It serves as a fake internet for malware analysis in case of malware is trying to download or connect to C2 server outbound.
The DNS service is disabled by inetsim by default. In order to enable it, we can use vim to change the conf file sudo vim /etc/inetsim/inetsim.conf. Then, after having done so,
- Uncomment the
start_service dns - scroll down to DNS service section and add
service_bind_address 0.0.0.0to it.
0.0.0.0address allows the service to listen to every IP address that connected to.
To let Windows connect to inetsim we would be talking about it on the further section.
Windows Network Setup -
On FlareVM (Windows 10 VM), we can perform network setup straightforward by following the steps below:
- Right-click on the FlareVM (Windows 10), the go to Settings…
- Click on Network tab
- In the Attached to drop-down menu, choose Internal Network
- Click on Name drop-down menu, choose mal-intnet, which we created recently
- Click on the Advanced drop-down menu, then enable the Promiscuous Mode to Allow VMs
- Then click Okay
Finally, your completely setting up would similar to the picture shows below,

Now, we can power on the Windows 10 VM and perform steps below:
- Then go to Settings > Network & Internet > Ethernet > Change adapter options
- Right-click on Ethernet adapter, then click on Properties
- Click on Internet Protocol Version 4 (TCP/IPv6), then Properties
- Perform the IP address as shows below:

As picture shows above, we can see that the Preferred DNS server is defined to the REMnux’s IP address, which is where inetsim is installed and configured.
To confirm that those devices are connected together we can try to ping from Windows to REMnux and from REMnux to Windows by using ping -c 5 <VM-ip addresses>.
Now, let we try to navigate to any website to check whether the inetsim is working or not. To do so, we need to run an inetsim on the REMnux first,
On REMnux, open a terminal and type inetsim,
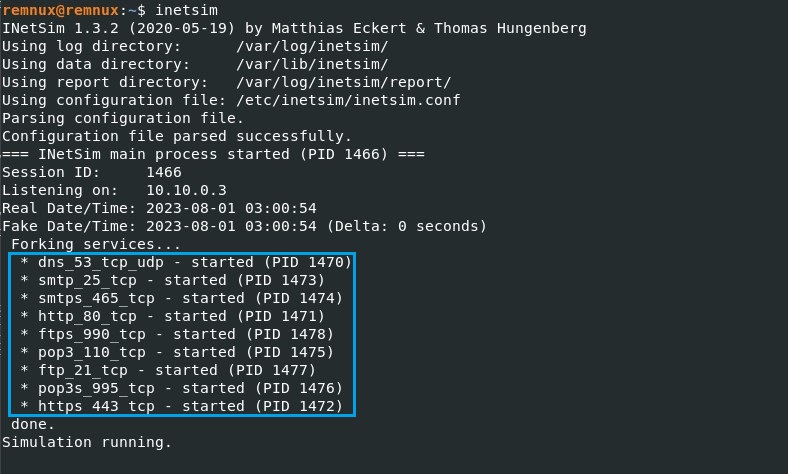
As shows on a picture above, the blue highlighted box describes which services are running. In this case, we focus on DNS service, which we would use to tunneling every URL requests by malware to simulate the internet.
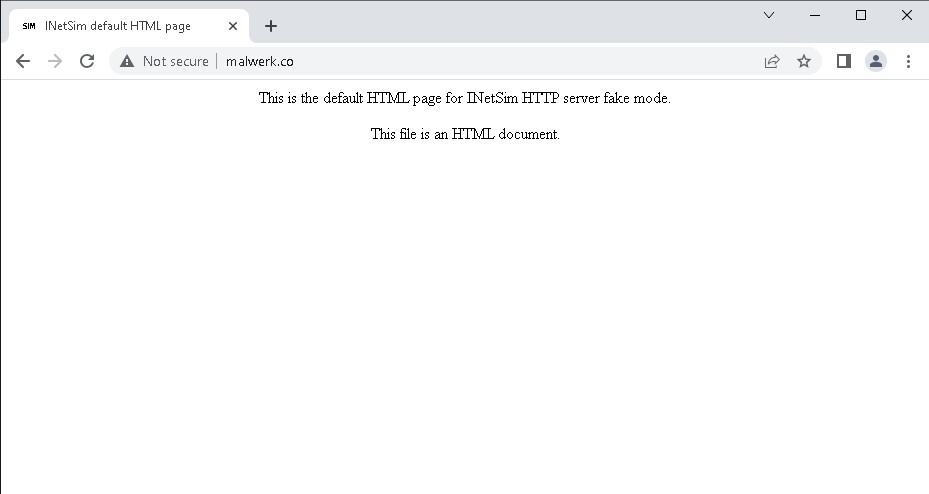
If you followed every instruction listed above, the result while using a browser to access the internet would be displayed below,
Malware Sample for Educational Purpose Sources
To gain a deeper understanding of malware, one must dissect it. Here are some resources for downloading malware samples for analysis,
- https://bazaar.abuse.ch/
- https://github.com/MalwareSamples/Malware-Feed
- https://github.com/fabrimagic72/malware-samples
- https://github.com/ytisf/theZoo
Conclusion
Setting Up a malware analysis is a first step to perform before we are going to dissect or learn how a malware works. One thing we must keep in mind everytime we are going to conduct a malware analysis is be safety, because what you are doing is obviously risky and you need somehow to protect your host machine from being infected.
In closing, I genuinely appreciate you taking the time to read this post, and I hope you found it both fascinating and informative. Please accept my apologies if there are any mistakes, and don’t be hesitant to let me know by any available channel, such as LinkedIn, Twitter (officially becomes X now), and so on. Your feedback would be greatly appreciated, as it would help me improve my ability to deliver effective cyber defense articles to the community in the future.
References
- https://en.wikipedia.org/wiki/Malware
- https://business.gov.au/online/cyber-security/cyber-security-and-your-business
- https://notes.huskyhacks.dev/blog/malware-analysis-labs-internal-network-vs-host-only
- https://www.techanarchy.net/installing-and-configuring-inetsim/