
Background
As a Defensive Security, if we want to gain skills, especially SIEM, we have to choose whether to subscription for a online defensive security practical such as, Cyberdefenders1, Tryhackme2, and so on. However, there is not the only way that we can approach in order to gain a specific skill.
During my preparation for a certification exam, I have decided to setup my own SIEM server using my own laptop on VM. Along with that, I also wrote this article to help junior or anyone who would like to build their own SIEM for practicing on threat hunting.
I hope you have found this article interesting. If there are any misunderstandings, I humbly offer my apologies and invite you to share your insights with me via email. Your feedback is invaluable in helping me to enhance and refine my future articles.
Installing Splunk
If you are new to Splunk, you can follow this step as a guide to install the Splunk Enterprise. First, you need to go to Splunk Official Website and Sign up for new user, if you are not signing up yet.
In the Splunk Homepage, you can navigating to Products > Splunk Enterprise > Free Trial or just navigate to this URL: https://www.splunk.com/en_us/download/splunk-enterprise.html.
Then, choose your operating system you will install the Splunk. In my demonstration, I will install it on Ubuntu which is a debian package.
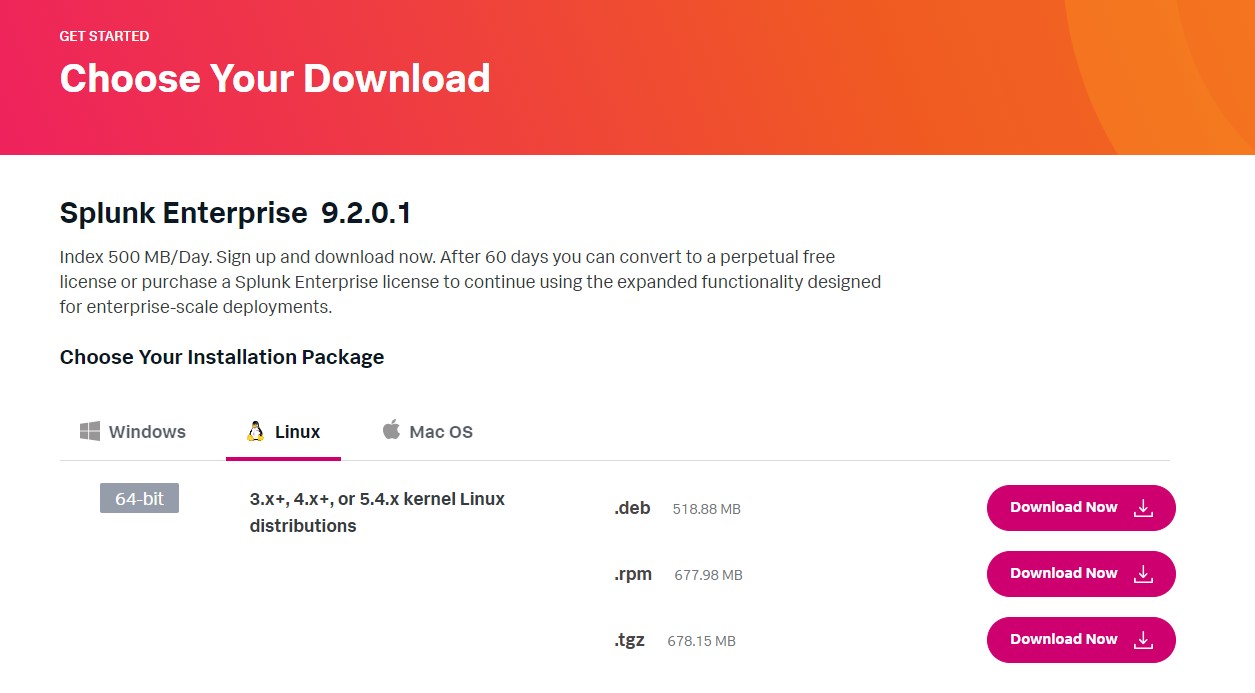 Figure 2-1: Installing Splunk Enterprise 9.2.0.1
After successfully download the package, you can installing the Splunk using command as shown below,
1
sudo dpkg -i splunk-9.2.0.1-*.deb
Finally, you are successfully installed Splunk. The default location is in /opt
Basic Usage
- To start the Splunk,
1
sudo /opt/splunk/bin/splunk start
- To stop the Splunk,
1
sudo /opt/splunk/bin/splunk stop
- To check the Splunk status,
1
sudo /opt/splunk/bin/splunk status
Run Splunk as a systemd service
In production environment, there are normally for sysadmin to make use of systemd which is a system startup and service manager that is widely deployed as the default init system on Linux distributions. This mean you don’t have to run /opt/splunk/bin/splunk start everytime you startup the system, but instead you can enable the Splunk to self-startup everytime you turn on the system.
To do so, we can use the command as shown below,
1
sudo /opt/splunk/bin/splunk enable boot-start -systemd-managed 1 -systemd-unit-file-name splunkd
Then, we can check if the command aforementioned is resulted properly by checking the systemd location located at /etc/systemd/system/ and find if there is the splunkd.service file occurred.
To start/stop the Splunk service, you can use command as shown below,
1
sudo systemctl [start | stop] splunkd.service
To enable/disable which allows Splunk to run as the system startup or not,
1
sudo systemctl [enable | disable] splunkd.service
To check the status of the Splunk,
1
2
3
4
5
6
7
8
9
10
11
secadmin@ubuntu:~# systemctl status splunkd.service
splunkd.service - Systemd service file for Splunk, generated by 'splunk enable boot-start'
     Loaded: loaded (/etc/systemd/system/splunkd.service; disabled; vendor preset: enabled)
     Active: active (running) since Fri 2024-02-09 12:41:18 +07; 1h 56min ago
    Process: 61482 ExecStartPost=/bin/bash -c chown -R splunk:splunk /sys/fs/cgroup/system.slice/splunkd.service (code=exited, status=0/SUCCESS)
   Main PID: 61480 (splunkd)
      Tasks: 266 (limit: 4555)
     Memory: 1.3G (limit: 3.7G)
        CPU: 1h 19min 55.780s
     CGroup: /system.slice/splunkd.service
<--snip-->
Installing Required Software
The Botsv2 requires some add-on to let the dataset display properly. Therefore, we have to install these add-ons before proceeding to the dataset ingestion.
The following table is the list of required software by the dataset:
| App / Add-on | Version | Download |
|---|---|---|
| Splunk Enterprise | 7.2.1 | http://www.splunk.com |
| SA-Investigator | 1.3.1 | https://splunkbase.splunk.com/app/3749/ |
| Base64 | 1.1 | https://splunkbase.splunk.com/app/1922/ |
| URL Toolbox | 1.6 | https://splunkbase.splunk.com/app/2734/ |
| Splunk Security Essentials | 2.3.0 | https://splunkbase.splunk.com/app/3435/ |
| JellyFisher | 0.1.0 | https://splunkbase.splunk.com/app/3626/ |
| Splunk Common Information Model | 4.12.0 | https://splunkbase.splunk.com/app/1621/ |
| Splunk Add-on for Apache | 1.0.0 | https://splunkbase.splunk.com/app/3186/ |
| Splunk Add-on for Microsoft Cloud Services | 2.0.3 | https://splunkbase.splunk.com/app/3110/ |
| Palo Alto Networks Add-on for Splunk | 3.8.2 | https://splunkbase.splunk.com/app/2757/ |
| Splunk Add-on for Symantec Endpoint Protection | 2.3.0 | https://splunkbase.splunk.com/app/2772/ |
| TA-Suricata | 2.3.3 | https://splunkbase.splunk.com/app/2760/ |
| Microsoft Sysmon Add-on | 6.0.4 | https://splunkbase.splunk.com/app/1914/ |
| Collectd App for Splunk Enterprise | 1.1 | https://splunkbase.splunk.com/app/2875/ |
| OSquery | 1 | https://splunkbase.splunk.com/app/3278/ |
| SSL Certificate Checker | 3.2 | https://splunkbase.splunk.com/app/3172/ |
| Website Monitoring | 2.5 | https://splunkbase.splunk.com/app/1493/ |
| Splunk Add-on for Microsoft IIS | 1.0.0 | https://splunkbase.splunk.com/app/3185/ |
| Splunk Add-on for Unix and Linux | 6.0.0 | https://splunkbase.splunk.com/app/833/ |
| Splunk Stream Add-on | 7.1.1 | https://splunkbase.splunk.com/app/1809/ |
| Splunk Add-on for Microsoft Windows | 5.0.1 | https://splunkbase.splunk.com/app/742/ |
To install the add-ons we first need to download those add-ons from Splunkbase3 and using simply bash script to install add-on as shown below,
1
2
3
4
5
for i in $(ls $HOME/Downloads/*.tgz); # Note that downloaded splunk app mostly compress with .tgz
do
    sudo /opt/splunk/bin/splunk install app $i -auth 'username:password' # Do not forget to use your own setup username and password
    sudo chown -R splunk:splunk /opt/splunk/etc/apps # Change the file owner to splunk user and splunk group
done
If the first method doesn’t work for you, here is another way to install them,
1
2
3
4
5
for i in $(ls $HOME/Downloads/*.tgz); # Note that downloaded splunk app mostly compress with .tgz
do
    sudo tar zxvf $i /opt/splunk/etc/apps/ # Using tar command to extract .tgz file to splunk app directory
    sudo chown -R splunk:splunk /opt/splunk/etc/apps # Change the file owner to splunk user and splunk group
done
After complete, you can verify by open up your browser, navigate to the Splunk server. If everything is installed correctly, the result would be as shows in Figure 4-1.
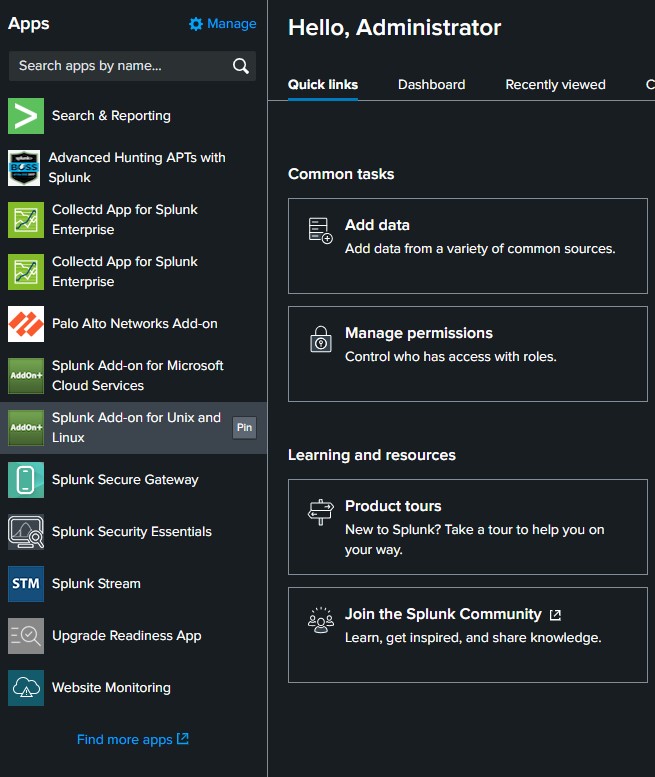 Figure 4-1: Verifying Splunk Add-Ons Installation
If it doesn’t appear as shown above, please make sure to restart the splunk service.
Ingesting BOTsv2 Dataset
Typically, the official repository4 has published us with two versions of datasets where the different between two of them is just the Full dataset and the minimal one which contains only attack-related data.
In case of saving storage, I will install the minimal one.
1
wget https://s3.amazonaws.com/botsdataset/botsv2/botsv2_data_set_attack_only.tgz -P $HOME/Downloads/
After completely downloaded the dataset, we have to decompress the file and place it to the app directory of installed Splunk location. (For me, the location is /opt/splunk/etc/apps/)
1
2
sudo tar zxvf $HOME/Downloads/botsv2_data_set_attack_only.tgz -C /opt/splunk/etc/apps/
sudo chown -R splunk:splunk /opt/splunk/etc/apps/botsv2_data_set_attack_only/
Then we need to restart the splunk to ensure that the dataset and add-ons are installed properly.
1
sudo systemctl restart splunkd.service
To verify if the dataset is installed correctly, you can use the SPL query as shown below to achieve that,
1
index="botsv2" earliest=0
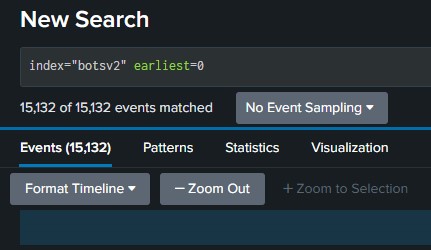 Figure 5-1: Verifying BOTSv2 Dataset
As Figure 5-1 depicted, the query matches 15,132 events which can conclude that the dataset has ingested correctly.
As part of my installation, I also found an interested app from splunkbase called “Boss of the SOC (BOTS) Advanced APT Hunting Companion App for Splunk”[^5] which is a guided learning approach to threat hunting withint the APT scenario based on BOTSv2 dataset. For junior threat hunter just like me, I highly recommend to check this out.
Finally, We are ready to hunt. Happy Hunting!
References
======= — title: Installing Splunk BOTSv2 Dataset author: 0x65dvrc date: 2024-02-09 13:20:25 +0700 categories: [Cybersecurity, Incident Response] tags: [threatHunting, incidentResponse, splunk, exercise, cybersecurity] toc: true pin: false lao: false image: path: img/images/Installing-Splunk-BOTSv2-Dataset/botsv2-cover.jpg alt: Splunk BOTSv2 Cover —
Background
As a Defensive Security, if we want to gain skills, especially SIEM, we have to choose whether to subscription for a online defensive security practical such as, Cyberdefenders1, Tryhackme2, and so on. However, there is not the only way that we can approach in order to gain a specific skill.
During my preparation for a certification exam, I have decided to setup my own SIEM server using my own laptop on VM. Along with that, I also wrote this article to help junior or anyone who would like to build their own SIEM for practicing on threat hunting.
I hope you have found this article interesting. If there are any misunderstandings, I humbly offer my apologies and invite you to share your insights with me via email. Your feedback is invaluable in helping me to enhance and refine my future articles.
Installing Splunk
If you are new to Splunk, you can follow this step as a guide to install the Splunk Enterprise. First, you need to go to Splunk Official Website and Sign up for new user, if you are not signing up yet.
In the Splunk Homepage, you can navigating to Products > Splunk Enterprise > Free Trial or just navigate to this URL: https://www.splunk.com/en_us/download/splunk-enterprise.html.
Then, choose your operating system you will install the Splunk. In my demonstration, I will install it on Ubuntu which is a debian package.
Figure 2-1: Installing Splunk Enterprise 9.2.0.1
After successfully download the package, you can installing the Splunk using command as shown below,
1
sudo dpkg -i splunk-9.2.0.1-*.deb
Finally, you are successfully installed Splunk. The default location is in /opt
Basic Usage
- To start the Splunk,
1
sudo /opt/splunk/bin/splunk start
- To stop the Splunk,
1
sudo /opt/splunk/bin/splunk stop
- To check the Splunk status,
1
sudo /opt/splunk/bin/splunk status
Run Splunk as a systemd service
In production environment, there are normally for sysadmin to make use of systemd which is a system startup and service manager that is widely deployed as the default init system on Linux distributions. This mean you don’t have to run /opt/splunk/bin/splunk start everytime you startup the system, but instead you can enable the Splunk to self-startup everytime you turn on the system.
To do so, we can use the command as shown below,
1
sudo /opt/splunk/bin/splunk enable boot-start -systemd-managed 1 -systemd-unit-file-name splunkd
Then, we can check if the command aforementioned is resulted properly by checking the systemd location located at /etc/systemd/system/ and find if there is the splunkd.service file occurred.
To start/stop the Splunk service, you can use command as shown below,
1
sudo systemctl [start | stop] splunkd.service
To enable/disable which allows Splunk to run as the system startup or not,
1
sudo systemctl [enable | disable] splunkd.service
To check the status of the Splunk,
1
2
3
4
5
6
7
8
9
10
11
secadmin@ubuntu:~# systemctl status splunkd.service
splunkd.service - Systemd service file for Splunk, generated by 'splunk enable boot-start'
     Loaded: loaded (/etc/systemd/system/splunkd.service; disabled; vendor preset: enabled)
     Active: active (running) since Fri 2024-02-09 12:41:18 +07; 1h 56min ago
    Process: 61482 ExecStartPost=/bin/bash -c chown -R splunk:splunk /sys/fs/cgroup/system.slice/splunkd.service (code=exited, status=0/SUCCESS)
   Main PID: 61480 (splunkd)
      Tasks: 266 (limit: 4555)
     Memory: 1.3G (limit: 3.7G)
        CPU: 1h 19min 55.780s
     CGroup: /system.slice/splunkd.service
<--snip-->
Installing Required Software
The Botsv2 requires some add-on to let the dataset display properly. Therefore, we have to install these add-ons before proceeding to the dataset ingestion.
The following table is the list of required software by the dataset:
| App / Add-on | Version | Download |
|---|---|---|
| Splunk Enterprise | 7.2.1 | http://www.splunk.com |
| SA-Investigator | 1.3.1 | https://splunkbase.splunk.com/app/3749/ |
| Base64 | 1.1 | https://splunkbase.splunk.com/app/1922/ |
| URL Toolbox | 1.6 | https://splunkbase.splunk.com/app/2734/ |
| Splunk Security Essentials | 2.3.0 | https://splunkbase.splunk.com/app/3435/ |
| JellyFisher | 0.1.0 | https://splunkbase.splunk.com/app/3626/ |
| Splunk Common Information Model | 4.12.0 | https://splunkbase.splunk.com/app/1621/ |
| Splunk Add-on for Apache | 1.0.0 | https://splunkbase.splunk.com/app/3186/ |
| Splunk Add-on for Microsoft Cloud Services | 2.0.3 | https://splunkbase.splunk.com/app/3110/ |
| Palo Alto Networks Add-on for Splunk | 3.8.2 | https://splunkbase.splunk.com/app/2757/ |
| Splunk Add-on for Symantec Endpoint Protection | 2.3.0 | https://splunkbase.splunk.com/app/2772/ |
| TA-Suricata | 2.3.3 | https://splunkbase.splunk.com/app/2760/ |
| Microsoft Sysmon Add-on | 6.0.4 | https://splunkbase.splunk.com/app/1914/ |
| Collectd App for Splunk Enterprise | 1.1 | https://splunkbase.splunk.com/app/2875/ |
| OSquery | 1 | https://splunkbase.splunk.com/app/3278/ |
| SSL Certificate Checker | 3.2 | https://splunkbase.splunk.com/app/3172/ |
| Website Monitoring | 2.5 | https://splunkbase.splunk.com/app/1493/ |
| Splunk Add-on for Microsoft IIS | 1.0.0 | https://splunkbase.splunk.com/app/3185/ |
| Splunk Add-on for Unix and Linux | 6.0.0 | https://splunkbase.splunk.com/app/833/ |
| Splunk Stream Add-on | 7.1.1 | https://splunkbase.splunk.com/app/1809/ |
| Splunk Add-on for Microsoft Windows | 5.0.1 | https://splunkbase.splunk.com/app/742/ |
To install the add-ons we first need to download those add-ons from Splunkbase3 and using simply bash script to install add-on as shown below,
1
2
3
4
5
for i in $(ls $HOME/Downloads/*.tgz); # Note that downloaded splunk app mostly compress with .tgz
do
    sudo /opt/splunk/bin/splunk install app $i -auth 'username:password' # Do not forget to use your own setup username and password
    sudo chown -R splunk:splunk /opt/splunk/etc/apps # Change the file owner to splunk user and splunk group
done
If the first method doesn’t work for you, here is another way to install them,
1
2
3
4
5
for i in $(ls $HOME/Downloads/*.tgz); # Note that downloaded splunk app mostly compress with .tgz
do
    sudo tar zxvf $i /opt/splunk/etc/apps/ # Using tar command to extract .tgz file to splunk app directory
    sudo chown -R splunk:splunk /opt/splunk/etc/apps # Change the file owner to splunk user and splunk group
done
After complete, you can verify by open up your browser, navigate to the Splunk server. If everything is installed correctly, the result would be as shows in Figure 4-1.
Figure 4-1: Verifying Splunk Add-Ons Installation
If it doesn’t appear as shown above, please make sure to restart the splunk service.
Ingesting BOTsv2 Dataset
Typically, the official repository4 has published us with two versions of datasets where the different between two of them is just the Full dataset and the minimal one which contains only attack-related data.
In case of saving storage, I will install the minimal one.
1
wget https://s3.amazonaws.com/botsdataset/botsv2/botsv2_data_set_attack_only.tgz -P $HOME/Downloads/
After completely downloaded the dataset, we have to decompress the file and place it to the app directory of installed Splunk location. (For me, the location is /opt/splunk/etc/apps/)
1
2
sudo tar zxvf $HOME/Downloads/botsv2_data_set_attack_only.tgz -C /opt/splunk/etc/apps/
sudo chown -R splunk:splunk /opt/splunk/etc/apps/botsv2_data_set_attack_only/
Then we need to restart the splunk to ensure that the dataset and add-ons are installed properly.
1
sudo systemctl restart splunkd.service
To verify if the dataset is installed correctly, you can use the SPL query as shown below to achieve that,
1
index="botsv2" earliest=0
Figure 5-1: Verifying BOTSv2 Dataset
As Figure 5-1 depicted, the query matches 15,132 events which can conclude that the dataset has ingested correctly.
As part of my installation, I also found an interested app from splunkbase called “Boss of the SOC (BOTS) Advanced APT Hunting Companion App for Splunk”[^5] which is a guided learning approach to threat hunting withint the APT scenario based on BOTSv2 dataset. For junior threat hunter just like me, I highly recommend to check this out.
Finally, We are ready to hunt. Happy Hunting!
References
4be4f79 (Added Creating Dummy Interface for network Traffic Analysis Blog) [^5]: (2024, Splunkbase), https://splunkbase.splunk.com/app/4430
-
(2024, Cyberdefenders), https://cyberdefenders.org ↩ ↩2
-
(2024, TryHackMe), https://tryhackme.com ↩ ↩2
-
(2024, Splunkbase), http://splunkbase.splunk.com/ ↩ ↩2
-
(2022, Github), https://github.com/splunk/botsv2 ↩ ↩2